The JSON Schema tester you really need

If you are looking for a way to test your JSON Schemas, you might be interested in the new JSON Schema tester from JSONBuddy. This tool allows you to validate your JSON Schemas against any number of JSON test data files, and check for consistency, correctness and coverage. In this blog post, we will show you how to use this tool and what benefits it can bring to your JSON Schema development.

What is a JSON Schema tester?

A JSON Schema tester is a tool that helps you to verify how a set of data files are validated against your JSON Schema resources. This is especially helpful during the design phase of the JSON Schema. The other way around, a JSON Schema test tool can also help you to ensure that your JSON data files match the expected structure and constraints defined by your JSON Schemas.

There are many online JSON Schema validators available. However, these online tools have some limitations. For example, they may not support the latest version of the JSON Schema specification, they may not allow you to test multiple JSON data files at once, or they may not provide detailed feedback on how well your JSON data covers your JSON Schema definitions.

That’s why JSONBuddy has developed a new JSON Schema test tool that aims to overcome these limitations and provide a more comprehensive and convenient way to test your JSON Schemas.

How to use the JSON Schema test tool from JSONBuddy?

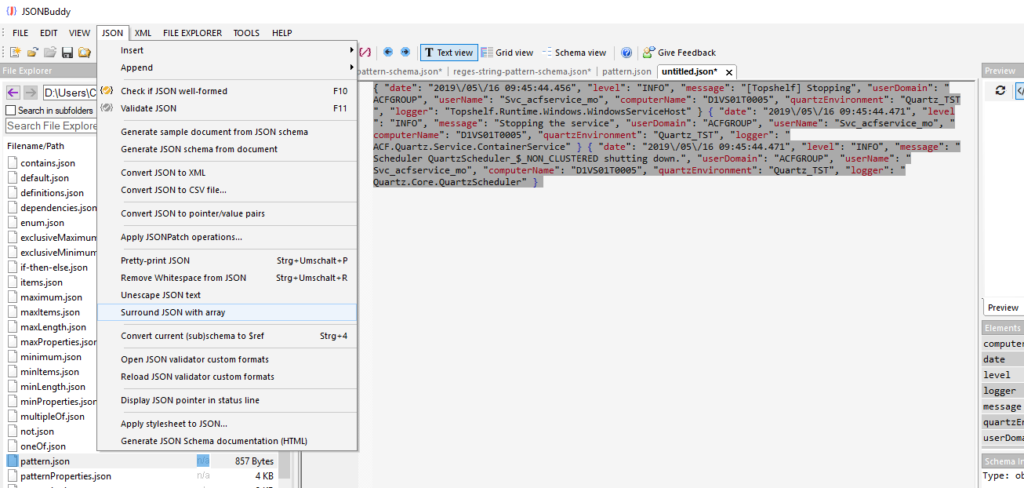
JSONBuddy is a desktop application that runs on Windows. You can download it for free from https://www.json-buddy.com.

To use the tool, you need to have either a JSON Schema file, a JSON Schema pool and one or more JSON data files that you want to test against it. You can either create them in the built-in editor of JSONBuddy, or import them from your local or remote sources. It is only required, that the test data files are accessible in a single local folder.

Once you have your files ready, you can start testing them by following these steps:

  1. Activate the Testing pane from the user-interface and bring the “Create new” tab to the front.
  2. Assign a descriptive name for your schema test entry. A good name should be clear, concise and meaningful to help you identify the test later.
  3. Set the JSON Schema resource. You can either select a predefined JSON Schema file
    or pick a schema pool that can contain multiple schema resources.
  4. As a final step, we choose the folder with the test data that we want to quickly and repeatedly validate against the selected JSON Schema resource.
  5. Click on the Add test button to add your JSON Schema file and your JSON data files.
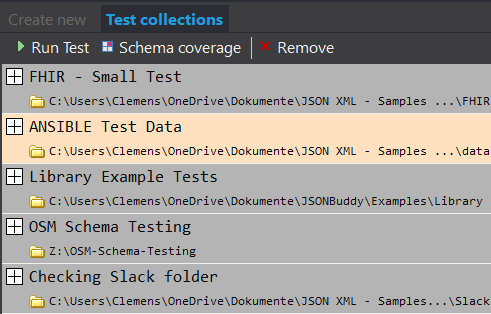
  6. Switch to the Test collections tab to see a list of already added test entries.
  7. Select an entry and click on the Run Test button to begin the validation process. The tool will check each JSON data file against the selected JSON Schema resource.
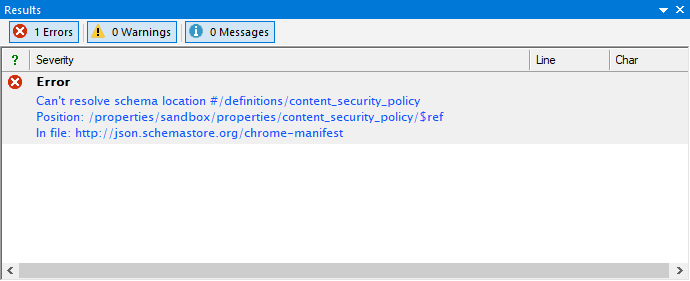
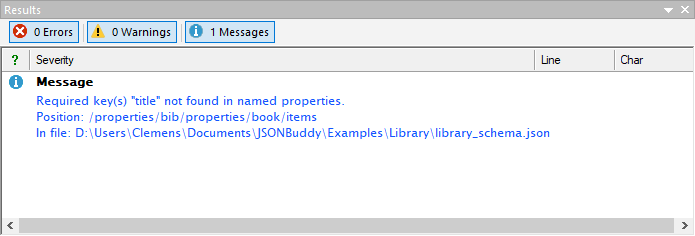
  8. After the test is completed, you can examine all validation
    results in detail. A separate log is saved for each test run to preserve the test data. This will show you the validation errors, warnings and processing information for each data file.
  9. Optionally, you can set a reference result for each JSON Schema test entry by clicking on the Set as reference button. This will allow you to compare ongoing tests with the reference result and see if there are any changes or errors.
  10. You can also view the schema definition coverage by clicking on the Schema Coverage button. This will show you which parts of the used schemas are checked by the test data, and which parts are not covered.
A collection of JSON Schema test entries

What are the main features of the JSON Schema test tool from JSONBuddy?

The JSON Schema test tool from JSONBuddy has several features that make it stand out from other online validators. Here are some of them:

  • It supports all versions of the JSON Schema specification, from Draft 4 to Draft 2020-12.
  • It allows you to test multiple JSON data files at once, without having to paste or upload them individually.
  • It allows you to set a reference result and compare ongoing tests with it. This can help you to check for consistency and correctness of your data over time.
  • It collects schema definition coverage information and shows you which parts of your schemas are tested by your data, and which parts are not. This can help you to improve your schema design and completeness.
  • It provides a summary report with one click, showing you the overall status of your tests, the number of errors and messages, and the coverage.
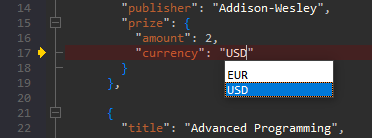
  • It integrates with the built-in editor of JSONBuddy, allowing you to edit your schemas and data files easily and see the validation results in real-time.

Why should you use the JSON Schema test tool from JSONBuddy?

The JSON Schema test tool from JSONBuddy is a powerful and convenient way to test your JSON Schemas and ensure that they are valid, compatible and complete. By using this tool, you can:

  • Save time and effort by testing multiple files at once
  • Avoid errors and inconsistencies by comparing tests with reference results
  • Improve your schema design and quality by collecting coverage information
  • Edit your schemas and data files with ease and see the validation results instantly

If you are interested in trying out the JSON Schema test tool from JSONBuddy, you can download it for free from https://www.json-buddy.com. You can also find more information and tutorials on how to use the software on the website.

Pretty-print and remove whitespace for large JSON data

What do you do if you need to compact a JSON document but the file has more than 400 MB and 20 Million lines? Or the other way around, you have a large document and it is impossible to read because it has no formatting? So you need a JSON editor which can do two things for you. The editor can open and view really large text files and it needs to know how to format or compact your JSON data. Luckily, JSONBuddy can do both for you.

Simply select your large JSON document in the built-in File Explorer window. You can also select multiple files if you need to do this for several documents:

Remove whitespace from big JSON data

Run either the “Pretty-print JSON” or “Remove whitespace from JSON” command from the JSON menu. JSONBuddy will save the output document next to the original JSON with a new file name. You will still have the original content as before on your disk.

Of course, you can run both commands on the current document in the JSON editor.

Configure and use JSON schema pools for validation

The JSON schema standard does not define a way to reference local or remote schema files for validation from within the JSON instance document. A JSON validator needs to support a way to load and assign schemas to the JSON data. Just setting a single root schema is not sufficient, if the schema itself references other components with $ref and $id. A JSON schema is identified by its $id and not by a local or remote path (Uri).

To address this, a schema pool can hold any number of JSON Schema files. One of those schemas is also set as the root schema in the configuration file.

Selecting a JSON Schema pool

In JSONBuddy, a schema for the active document can be selected using the Quick Associations pane. You can either set a pool or a local or remote path to the root schema as an alternative. If a schema pool is selected, the edit field to enter a path is disabled. The current schema pool assignment can be cleared with the red X button to the right.

Select a JSON Schema pool

The schema pools configuration file

All available JSON schema pools are configured using a settings document. This JSON file can be opened in JSONBuddy with the “Open config…” button. Add and edit the single pool entries directly in the JSON editor to change the configuration. Save the JSON file as usual and use the “Reload” button of the “Quick Associations” pane to apply the modifications to the schema pools used for JSON validation.

Here is an example of a simple schema pools configuration file:

[
  {
    "id": "1948DF5D-0765-4939-9F88-64CD3BB1D306-0",
    "title": "Library Example Schema",
    "version": 1,
    "rootIndex": 0,
    "entries": [
      "SchemaPools\\Library\\library_schema_root.json",
      "SchemaPools\\Library\\library_schema_book.json"
    ]
  }  
]
PropertyTypeDescription
idstringA unique identifier of the pool within this configuration file.
titlestringTitle to be displayed.
rootIndexintegerZero-based index to set the root schema of this pool. If omitted, the first entry is taken as root schema.
entriesarrayAn array of strings with local or remote (Url) paths to the schema documents. For local paths, the entry can be a relative path with the configuration file as the base.
Properties of a JSON schema pool entry.

Introducing the JSON Schema validation debugger

You got a JSON Schema written by someone else and have difficulty understanding why your data is not checked as you expected? Wouldn’t it be nice if you could step through the validation process and learn how the schema is applied to your JSON? Are you already thinking about a JSON Schema validation debugger?

You changed something in your JSON Schema and you want to be sure quickly, that your instance location is still validated? Setting a breakpoint in your JSON data would be very helpful in this case.

You check a huge JSON document with thousands of lines and you want to see in seconds what schema part validates a certain key? Just use the debugger and set a breakpoint at any JSONPointer location.

Well, there is a JSON editor available where you can do this and even more. Just start JSONBuddy Plus and run the JSON Schema validation debugger with a single click:

Starting the JSON validation debugger

The JSON editor will then arrange the instance document to the left and the root JSON Schema file to the right. The locations of the first validation steps are marked with yellow arrows in the left margin areas of the editor windows. The current lines are also indicated with an alternative background color. Therefore, the current validation step is always clearly visible.

Debugging commands

The debugger toolbar

You can find all of the usual debugger commands in the toolbar. Often it will be quicker to use the keyboard. Press F8 for a single step and Ctrl+F8 to run until the next breakpoint or validation error. There is also an option to toggle if the debugger should break whenever a validation error occurred.

A breakpoint can be set in the instance document and any referenced JSON Schema file with the right-mouse-click context menu in the text editor window.

Set a breakpoint in the JSON instance document
Debugging stopped at a breakpoint

Getting a deeper understanding of the JSON Schema validation process is only one reason to use the debugger. It saves a lot of time on getting a schema ready for production. But don’t forget to restart the debugger session if you modify any of the JSON Schema files.

Editing the JSON input data while debugging

Furthermore, it is possible to edit the JSON data while the debugger session is active. Jump from error to error to resolve and fix any issues in the instance.

Validation stopped in JSON debugger at an error.

In order to give additional details about the error, all of the usual context information and indicators are also available while running the debugger. As a consequence, it is often easy to apply the fix.

Fixing the error and continuing with debugging

Please note, that major changes to the structure of the JSON input can result in making it impossible for the debugger to find any subsequent error locations. In this case, it is recommended to restart the validation in the JSON editor.

Don’t underrate the benefits of a debugger

Learn about the details of an unknown schema. Resolve errors in JSON data step by step. Not to mention, check if a property is validated in huge JSON documents quickly. The benefits of having a validation debugger in your JSON editor are numerous.

Tales from support: Reading a JSON log file

Convert a sequence of JSON objects into a valid array

To make headway, all John had to do was pointing JSONBuddy to the data structure inherent in the NLog derived log file. In his case, the log file was a sequence of JSON objects, and that meant using the “Surround with JSON array” command is the thing to do. One click and voila, JSONBuddy came to terms with the input before proceeding to accurately render it in the JSON editor.

The command will format the current selection or the whole document if no selection is set. You will get a well-formed JSON array afterward in the editor window and you can pretty-print it using Ctrl-Shift-p. Moreover, you can also open the log in the Grid window.

I simply sent John a message explaining those steps, and a few minutes later, I got an affirmative “Thank you” as a reply. One more happy client!

Full support for JSON schema draft 2019-09

JSONBuddy 6 was released on June, 12th 2021. One of the major new features in the JSON editor is the full support of the JSON Schema draft 2019-09. This means the built-in validator is passing all test cases of the official test suite (around 1000 cases). Hence, JSONBuddy enables you to write and test JSON schemas for all popular drafts.

Tales from support: Reading a JSON log file

So, I got this message not too long ago from a new user of JSONBuddy.

The user wrote: “Trying to read log files generated with NLog in Json format. JSONBuddy JSON editor complaining about format. Example data from file: { … some sample data… }”

Apparently, the user, let’s call him John to make this sound less “robotic”, was experiencing issues with reading a JSON log file generated with NLog and he was curious if JSONBuddy can help as a mature JSON editor.

Use JSONBuddy to open your log data

First things first, JSONBuddy wholly and thoroughly supports log files presented in JSON format and unsurprisingly so. Asides from being readily readable in your JSON editor, a trait not so many other log formats can boast of having, the JSON data format shines outstandingly in that it presents data in a reasonably compact and heavily structured form.

What this means is that your log files gains attributes typically associated with big data – it is layered as you would find in traditional database architectures and finely structured to make querying, analytics, or troubleshooting less of a hassle than it normally is.

So back to John now. His issue was essentially down to the fact that JSONBuddy was having a hard time recognizing the log file he was browsing in the JSON editor. And that’s because JSON supports an increasingly wide array of data structures including but not limited to Objects, Arrays, Strings, and Values. Each data structure has its peculiarities and as such, is handled differently by the JSONBuddy editor.

Convert a sequence of JSON objects into a valid array

To make headway, all John had to do was point JSONBuddy to the data structure inherent in the NLog derived log file. In his case, the log files was a sequence of JSON objects, and that meant using the “Surround with JSON array” command is the thing to do. One click and voila, JSONBuddy came to terms with the input before proceeding to accurately render it in the JSON editor.

The command will format the current selection or the whole document if no selection is set. You will get a well-formed JSON array afterward in the editor window and you can pretty-print it using Ctrl-Shift-p. Moreover, you can also open the log in the Grid window.

I simply sent John a message explaining those steps, and a few minutes later, I got an affirmative “Thank you” as a reply. One more happy client!

A JSON linter for JSON schema

If you follow the JSON schema Slack workspace or the JSON schema tag at StackOverflow, you will notice that schema authors are often struggling with the same problems while writing a valid and working JSON schema.

A type specifier or a schema keyword is mistyped, an unresolved $ref because the target is missing or the pointer is not correct or a required property is not defined. It is usually easy to fix those errors but unfortunately, it often takes a long time to find them.

Saving time while creating JSON schemas

This is the point, where the built-in JSON Schema analyzer of JSONBuddy can help you to save a lot of time and hassle if you use the tool as your JSON Schema editor. The analyzer is a linter for JSON schema and runs in the background while you are working on your schema. Whenever the schema linter finds something to report, you will get a message in the results window.

Let us take a quick look at an example from the real world.

Someone removed a definition from the JSON schema

You are working on a big schema and someone from your group removed a definition accidentally. The next time you open the JSON schema, JSONBuddy will show you the following message:

JSON schema linter message about an unresolved $ref

This allows you to fix the error right away. You can go to the version history of the JSON Schema in your repository and revert the change to get the definition back.

If you want to learn more about the JSON schema linter in JSONBuddy, take a look at the following page: JSON schema analyzer – Get a unique companion while editing your JSON schemas.

JSON Schema in the wild: A missing required property

There are some issues that happen over and over again if you write JSON schemas with a plain text editor. You can often follow them in the Slack community for JSON schema or at StackOverflow: A schema is modified and the validation is no longer working as before but nobody knows about it at the time the schema was changed.

The good news is: The built-in JSON schema analyzer in JSONBuddy can detect a lot of those issues while you are editing your schema in the JSON editor.

A while ago this happened to a user: A property was removed from the JSON Schema but was still present in the “required” keyword array. As a consequence, a lot of the JSON data was invalid.

Use an extraordinary JSON schema editor

This can’t happen if you use JSONBuddy as your JSON schema editor. Because the built-in schema analyzer reports the missing required property definition right at the time when you are editing your schema. Instead, you get the following warning:

Warning about a missing required property.

This and several other common issues are reported by the schema analyzer if you use JSONBuddy as your JSON schema editor. Providing you with exceptional support when working with JSON Schema documents helps to save time and avoid extra work.

Tales from support: How to convert huge JSON data to CSV

A customer was looking for help how to convert big JSON data to CSV using JSONBuddy. In general, the JSON editor offers several functionalities without the need to load the document into the tool (like pretty-printing and removing any whitespace). This allows the processing of much larger data as usually supported by other software. The JSON input of the customer was about 360 MB with millions of lines. For this article, I’m using a sample document of more than 400 MB.

So this is my recommendation on how to convert a large input file using JSONBuddy:

  • Open the JSON document in the editor using the Large File view. This way you can check the structure of the JSON data and you can see the JSONPointer location to set the starting point for the conversion. In addition, the conversion also supports converting JSON input starting with a top-level array.
  • Use the “JSON to CSV file…” command from the built-in File Explorer window. In this case, the editor doesn’t load the whole document at once. However, it can take a while until the following conversion dialog is displayed. My middle-class PC shows the dialog after 80 seconds for the 438 MB sample file below:
Use the command from the File Explorer context menu to convert big JSON data
  • The conversion dialog is used to set the starting point, the columns, and the output format. Please note that the list of JSON values to the right is only updated after you moved the input focus away from the JSONPointer edit field at the left:
Dialog with preview of CSV output for huge JSON input
  • After clicking “Convert”, the output CSV is written as a new document next to the JSON input with .csv as the file extension. This takes about 110 seconds on my system and generates 130 MB of CSV data.
  • Afterward, you can load the CSV as plain text into the editor. Again using the Large File view.